
위의 폰트를 사용할 예정
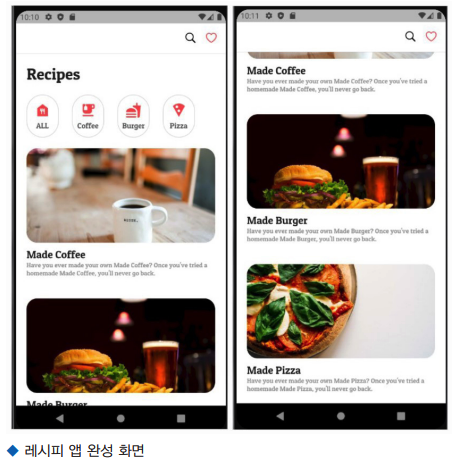
| 디자인 시안
| 폴더생성 (이미지와 폰트를 넣어줄)
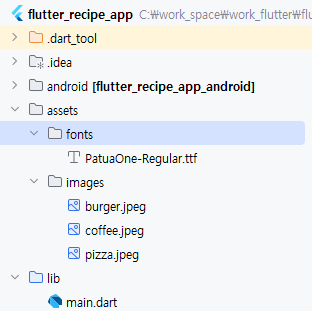
| 폴더 전체를 사용하기 위해서 yaml을 아래와 같이 설정해준다.
  # To add assets to your application, add an assets section, like this:
  assets:
    - assets/images/
| 폰트도 설정해야 하기 때문에 yaml에 이렇게 설정!
  # example:
  fonts:
    - family: PatuaOne
      fonts:
        - asset: assets/fonts/PatuaOne-Regular.ttf
  #       - asset: fonts/Schyler-Italic.ttf
| 메인의 앱바 만들어보기
import 'package:flutter/cupertino.dart';
import 'package:flutter/material.dart';
import 'package:flutter_recipe_app/recipe_list_item.dart';
import 'package:flutter_recipe_app/recipe_menu.dart';
import 'package:flutter_recipe_app/recipe_title.dart';

// 플러터 코드의 시작점
void main() {
  // MyApp 위젯을 루트 위젯으로 만들어 주는 함수 이다.
  // 사전 기반 지식 ---. 위젯 트리를 떠올려 주세요
  runApp(MyApp());
}

// 위젯을 만들 때 크게 두가지로 구분한다.
// StatelessWidget 위젯은 상태 변경이 없는 위젯을 화면에 그릴 때 선택한다.

// 상속문법 사용
// 우리들만에 약속 - MyApp -> 머터리얼 앱 객체를 활용하자.
class MyApp extends StatelessWidget {
  // 생성자 - 선택적 명명 매개 변수( 값을 넣어도 안 넣어도 되고)
  MyApp({super.key});

  // 보통 루트 위젯을 시작할 때 MaterialApp을 많이 활용 한다.
  @override
  Widget build(BuildContext context) {
    return MaterialApp(
      debugShowCheckedModeBanner: false,
      theme: ThemeData(fontFamily: 'PatuaOne'),
      // 앱 실행 되었을 때 첫 페이지를 지정할 수 있다.
      home: RecipePage(),
    );
  }
} // end of class

// 우리들만에 규칙 2 - 페이지라고 이름 붙이는 클래스는 스캐아폴더를 활용하자.
class RecipePage extends StatelessWidget {
  const RecipePage({super.key});

  @override
  Widget build(BuildContext context) {
    // 시각적 레이아웃 구조를 잡아 주는 위젯
    // app 영역
    // body 영역
    // bottom 영역
    return Scaffold(
      appBar: _buildRecipeAppBar(),
      body: Padding(
        padding: const EdgeInsets.symmetric(horizontal: 20),
        child: ListView(
          children: [
            RecipeTitle(),
            RecipeMenu(),
            // 레시피 아이템
            RecipeListItem('coffee', 'Made Coffee'),
            RecipeListItem('burger', 'Made Burger'),
            RecipeListItem('pizza', 'Made Pizza'),
            // 레시피 아이템
            // 레시피 아이템
          ],
        ),
      ),
    );
  } // end of build method

  // 메서드를 만들어 보자.
  // private
  AppBar _buildRecipeAppBar() {
    return AppBar(
      backgroundColor: Colors.white,
      iconTheme: IconThemeData(color: Colors.black),
      //elevation: 1.0,
      actions: [
        Icon(CupertinoIcons.search, color: Colors.black),
        SizedBox(width: 15),
        Icon(CupertinoIcons.heart, color: Colors.red),
        SizedBox(width: 15)
      ],
    );
  }
}
| 타이틀 설정
import 'package:flutter/material.dart';

// 레시피 타이틀 클래스를(위젯) 만들어 보자
class RecipeTitle extends StatelessWidget {
  const RecipeTitle({super.key});

  @override
  Widget build(BuildContext context) {
    return Padding(
      padding: const EdgeInsets.only(top: 20, left: 20),
      child: Text('Recipes', style: TextStyle(fontSize: 30)),
    );
  }
}
| 메뉴 설정
import 'package:flutter/material.dart';

class RecipeMenu extends StatelessWidget {
  const RecipeMenu({super.key});

  @override
  Widget build(BuildContext context) {
    return Padding(
      padding: const EdgeInsets.all(8.0),
      child: Row(
        mainAxisAlignment: MainAxisAlignment.center,
        children: [
          _buildMenuIcon(Icons.food_bank, 'ALL'),
          SizedBox(width: 25),
          _buildMenuIcon(Icons.emoji_food_beverage, 'Coffee'),
          SizedBox(width: 25),
          _buildMenuIcon(Icons.fastfood, 'Burger'),
          SizedBox(width: 25),
          _buildMenuIcon(Icons.local_pizza, 'Pizza'),
        ],
      ),
    );
  }

  // 메서드 만들어 보기
  // Container 위젯을 꾸며주고 싶다면
  Widget _buildMenuIcon(IconData mIcon, String text) {
    // container 위젯에 color 속성과 decoration 속성을 함께 쓰면 무조건 오류
    // 둘 중의 하나만 사용해야 함
    return Container(
      width: 60,
      height: 80,
      decoration: BoxDecoration(
        border: Border.all(color: Colors.black12),
        borderRadius: BorderRadius.circular(25),
      ),
      child: Column(
        mainAxisAlignment:
            MainAxisAlignment.center, //위에서부터 시작, 밑에서부터 시작이면 end 가운데면 center
        children: [
          Icon(mIcon, color: Colors.red),
          SizedBox(
            height: 5,
          ),
          Text(
            text,
            style: TextStyle(color: Colors.black54),
          )
        ],
      ),
    );
  }
}
| 리스트 아이템 만들기
import 'package:flutter/material.dart';

class RecipeListItem extends StatelessWidget {
  final String imageName;
  final String title;
  // 하드 코딩
  const RecipeListItem(this.imageName, this.title, {super.key});

  @override
  Widget build(BuildContext context) {
    return Padding(
      padding: const EdgeInsets.symmetric(vertical: 20),
      child: Column(
        crossAxisAlignment: CrossAxisAlignment.start,
        children: [
          // 이미지 비율을 지정할 수 있다.
          AspectRatio(
            aspectRatio: 2 / 1,
            child: ClipRRect(
              borderRadius: BorderRadius.circular(20),
              child: Image.asset(
                'assets/images/${imageName}.jpeg',
                fit: BoxFit.cover,
              ),
            ),
          ),
          SizedBox(height: 10),
          Text(title, style: TextStyle(fontSize: 20)),
          Text('Have you erver ................ ')
          // 텍스트 1
          // 텍스트 2
        ],
      ),
    );
  }
}'플러터 > 화면구현' 카테고리의 다른 글
| [플러터] RiverPod 상태 관리를 활용한 To-Do List 앱 만들기 (0) | 2025.01.23 |
|---|---|
| [플러터] MVVM 패턴으로 TODOList 만들기 (0) | 2025.01.22 |
| [플러터] 텍스트필드와 스크롤 사용 (0) | 2025.01.20 |
| [플러터] 상태관리가 되는 간단한 앱 -1 (쇼핑카트) (1) | 2025.01.20 |
| [플러터] 화면구현 용어 기초 - 1 (0) | 2025.01.08 |